Wicking Beds 3.0
Things I learned about wicking garden beds…
by Team Member: Ray Jess
Listen to his podcast HERE
When I was introduced to wicking beds almost four years ago, I became obsessed. I have built them at home, for friends, and even built a few on contract. I enjoyed giving suggestions and recommendations to anyone who expressed an interest in wicking beds. I planted, cared for, observed throughout the seasons and adjusted for the health of the plants and soil. As a lifelong learner, through observation of the plants and the garden, I learned many things about wicking beds. Here are some of my takeaways so far.
One size does not fit all
The size of the garden bed is important and highly personal. Consideration must be given to the person tending the garden. When planning a raised garden, a good rule of thumb is: it shouldn’t be any wider than twice the arm reach of the shortest person working the bed. In other words – can the shortest person reach the middle comfortably?
Another consideration is the height of the garden. Build the bed to a height that is comfortable for the shortest person working the garden. A friend of mine built a wicking garden bed 3 feet tall because she had back issues, and that worked great for her. She filled the bottom 18 inches of the bed with sand before installing the liner. Additional thoughts are how many people are being fed from the garden, how close to the house should the garden be, and how close is the water supply?
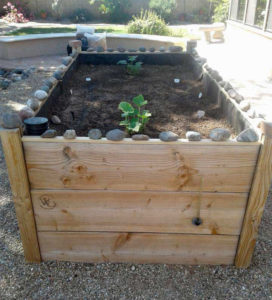
Wicking bed with drain midway up.
Wicking beds are unique; they do have a few height limitations. The reservoir should be no more than 11 inches deep and the planting medium the same. The science behind this is that capillary action cannot move water upward more than 11 ¾ inches. Here in the desert where I live, because of our heat, it is a combination of capillary action and evaporation which move the water upward. In the early morning, I can see evidence of water moving up in the moisture rings around the base of my plants, this dissipates as the day heats up and the top soil dries out.
Taking a compass bearing
I was asked to build a raised garden bed with a friend. She had decided on the orientation for purely aesthetic reasons based on the view from the house. It wasn’t until months later, during the summer heat, we realized the bed was getting full sun along its eight-foot length. She was having had a difficult time keeping plants alive, especially along the south and west sides. This was right after I discovered wicking beds, so we converted it to a wicking bed thinking the addition of a reservoir would help solve the heat issue. It wasn’t until the following summer we discovered this did not resolve the issue enough. The garden still performed poorly, not because of the summer heat we realized, but due to the bed’s orientation.
Most experts believe the best way to orient garden rows and raised beds in the Northern hemisphere is north to south— with short sides of the garden facing the north/south. This gives the best sun exposure, allows for ample air circulation, and reduces the heat gain to the framing material. The bed we built was oriented east/west; the better orientation should have been… north/south.
Going around the block a few times
Stone blocks do not make a good frame for a garden bed, at least not in the southwest desert. They can add an additional 8” or so to each side of the garden bed, which reduces the actual planting area and can make the center more difficult to reach. On top of that, stone and cinder blocks are a heat sink material – a true negative in hotter gardening zones. They capture the heat of the day and continue to radiate it during the cooler evening hours. The garden does not have an opportunity to cool down using these materials. On the plus side, I have to admit they are comfortable to sit on while tending the garden.
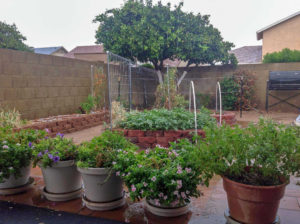
My older gardens using stone blocks
After several years of using them around my yard and for my raised beds, my current garden beds are made from 2 X 12 wood planks. I found really cool and clean looking metal corners online which made my newest garden bed look more attractive than any of my previous builds.
Keeping my cool
In an effort to keep the planting medium appropriately cool, I experimented with 3/8” foam insulation between the wooden frame and the pond liner in on of my wicking beds. And yet when I started recording temperatures in the two equally sized, side-by-side gardens, I discovered the insulation actually held the heat in the planting medium instead of mitigating the heat gain. I believe foam insulation would be a great option in the colder regions, but not for hot zones like mine.
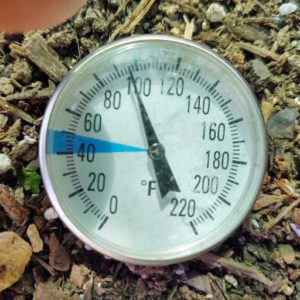
98 degrees with insulation
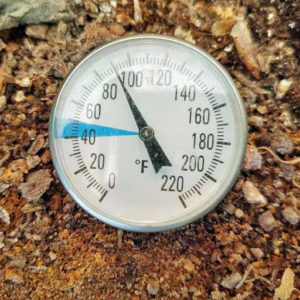
90 degrees in garden without insulation
To rock or not to rock
When I built my first wicking bed, I based my design on the beds built by the person who introduced me to the concept. She originally used large river rock in her reservoirs. However, she learned such large rocks did not allow water to move up to the planting medium. So instead I used ¼” river rock which worked well.
After building these beds, I found an article written by Collin Austin stating the use of a rock filled reservoir was not his design, and in fact he indicated the planting medium itself should be part of the reservoir. So, in my next version (Wicking Beds 2.0) built at my friend’s house, we experimented by using a different fill pipe and put the planting medium all the way to the bottom of the garden bed. The wicking properties of this design was excellent.
One pipe is not like the other
Since the wicking bed 2.0 garden was working so well, I changed the internal structure of one of my personal beds to match. We found the 1 ¼” PVC pipe previously used didn’t fill the reservoir quickly, so I changed to the Bend-A-Drain 4” polypropylene flexible drain pipe used in 2.0. It was easy to see how the wider pipe allowed filling the reservoir easier and more efficiently, and we appreciated how it became another way to view the reservoir water level.
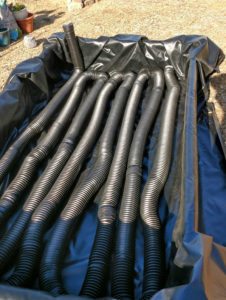
Wicking Bed 2.0 with flexible drain pipe
A good flush will help.
Water naturally creates a build-up of salts in the reservoir, which I prefer over it building up in the root-zone. This remedy is a semi-annual flush. When I drained and flushed the reservoir that only had planting medium and no rocks however, there wasn’t a void space for the fresh water to move freely. To adequately flush this bed and remove built up salt and minerals, I heavily watered the planting medium from the top to the bottom of the reservoir and out the overflow drain.
This was a waste of water and nutrients, and I hate wasting resources. So I changed the internal structure of the garden bed again by emptying my garden between planting seasons. This time I kept the 4” pipe but went back to the ¼” river rock as the base of the reservoir. I use shade cloth as a separator between the reservoir and the planting medium and reused a portion of the previous planting medium. This change combines the ease of fill, observable water level, and the ability to flush out the rock reservoir. I am much happier with these results.
One thing at a time!
It is easy to fill the garden bed using the 4” pipe. The idea is to fill the reservoir quickly with a moderately high volume of water over a short period of time. However, it is easy to walk away from the garden when filling the reservoir because we always have “something next” to do. Recently, two different friends overwatered by doing the exact same thing; they put the hose in the fill end of the tube, turned the water on and walked away to tend to something else forgetting about the water for an extended period of time. As you can expect, the water filled their beds and spilled over the sides. The ½” overflow tube could not handle the water volume added to the bed so in Wicking bed 2.0 the unsecured sides gave way. Best choice…us a timer on your water spigot.
With water within easy reach, plants can get lazy
I was surprised to realize the plants in my bed developed root balls smaller than I expected compared to plants in other garden methods. Even if a plant is transplanted from a large pot into a wicking bed, over time the roots shrink. Since water is always available to the plant at the root level, the plant adapts to the consistent moisture level and the root ball generally stays around six inches in diameter. During most of the year this is not an issue in our climate. However, when growing summer vegetables with large leaves, the roots cannot take up enough moisture to keep up with the evaporation during the 100+° days. Consequently, the plants look poor during the day but generally recover overnight.

Small root ball on plants
Take notes and grow
As gardeners, the best we can do for our gardens is to love, care for and observe them on a frequent basis. Watch what is happening and, if it is not what you expect, find out why and takes steps to resolve the situation. Take every opportunity to learn and add those lessons to your mental tool box. The things I have mentioned are a few of my lessons learned. Has this article reminded you of something you’ve learned in your garden practice that you would like to share with others? Please add your lesson(s) learned to the comment section below.
UrbanFarm.org/wicking3
About this author:
 After retiring from two careers, the Air Force and teaching, Ray pursued his love of food by graduating from the Phoenix Art Institute with a certificate in Culinary Arts. The highlight of his culinary experience was working as a chef for the 2007 Super Bowl at the University of Phoenix Stadium. Natural extensions for this self-proclaimed foodie were the completion of his Master Gardener training and his Certificate in Permaculture Design.
A love of fresh foods and herbs kept him gardening for the last two decades. During a volunteer component of his Master Gardener training, Ray discovered wicking garden beds. A man of curiosity and a seeker of ways to do things more efficiently, he embarked on a research project leading him to the Father of Wicking Beds, Collin Austin. As a result of Ray’s research, his backyard garden has evolved from rows of crops in a plot of ground, to raised beds, to grow-buckets and wicking beds. He is currently keeping his eyes open for the next great idea to perfect his garden, so he can keep giving his family, friends, and neighbors fresh produce.
To contact Raymond please leave a comment on one of his articles or send an email to him via podcast@urbanfarm.org and we will forward it to him.
To listen to Raymond’s Podcast click HERE
To read other articles by Raymond click HERE
*Disclosure:
Some of the links in our podcast show notes and blog posts are affiliate links and if you go through them to make a purchase, we will earn a nominal commission at no cost to you. We offer links to items recommended by our podcast guests and guest writers as a service to our audience and these items are not selected because of the commission we receive from your purchases. We know the decision is yours, and whether you decide to buy something is completely up to you.



I can’t say enough about what I’ve learned from Ray when it comes to wicking beds. I love trying new things and seeing what happens. The flexible drain pipe was a major enhancement to the ease of filling a bed. And I will be trying the metal corners next – they look cool!! Thanks Ray!
Love the concept and updates. Piecing together my own version with many similarities to your design. My own concern is a struggle to locally source a bulkhead with threads long enough to come through my 2x6s. Could you provide a link or information on where you sourced your bulkhead? My local options are designed to only need to reach through a shallow wall such as a plastic water reservoir.
Thank you for the comment. I too had an issue locating a bulkhead fitting long enough to go through a 2 X 12. Someone pointed me to my local Granger Industrial Supply company. I took s drive to the store nearest me and sure enough, they had what I was looking for. The link to the store nearest me is https://www.grainger.com/branch/Phoenix-Branch-604 and yes, I believe they do ship to the customer (you might have to ask to be sure). I believe the part number for the bulkhead fitting is BFA2005TES and the 90° elbow part number is either HB0050-90 or H80050-90. I do not know the price at the moment. I hope this helps you find the needed parts. I would enjoy seeing your design of a wicking bed and what you have done differently. I think any design will change over time as we work with, observe and continue to learn about new ideas that will help us refine what we create.
Ray
Hi Ray,
Thanks for your excellent posts about constructing wicking gardens in arid hot places.
Regarding the use of pea gravel at the bottom of the planter where the 4″ flex pipe is positioned, is the gravel under the pipe, on either side of the pipe or all around the pipe? About how deep is the gravel.
Thanks,
Ed
Hi Ed,
In regards to the flex pipe, I put the pipe right next to the pond liner and then put the rock on the sides and top of the pipe. Having the pipe this low to the bottom of the bed allows a more complete “flush” of the system twice a year. If there is anything that settles in the bottom of the pipes, it will be carried away as you flush.
The main reason for flushing the reservoir here in the Southwest, is our water has a heavy concentration of salt and minerals. So when I flush, I fill the bed, let it set for a couple of hours to dissolve what salts and minerals have accumulated on the rock and then put the hose running full blast into the fill tube and let the bed drain out the overflow tube. I generally let the hose run for about 15 minutes then let the bed drain for a few hours. When I fill the reservoir again with fresh water I feel confident the plants are getting the best water I have to give them.
Water can only wick up about 11.5 inches, so I would not make the reservoir any deeper than that. In my beds, I use 2 X 12’s for constructing them and my reservoir is about 10 inches deep.
Hi Ed,
In regards to the flex pipe, I put the pipe on top of the pond liner and then put the rock on the sides and top of the pipe. Having the pipe this low to the bottom of the bed allows a more complete “flush” of the system twice a year. If there is anything that settles in the bottom of the pipes, it will be carried away as you flush.
The main reason for flushing the reservoir here in the Southwest, is our water has a heavy concentration of salt and minerals. So when I flush, I fill the bed, let it set for a couple of hours to dissolve what salts and minerals have accumulated in the reservoir and then put the hose running full blast into the fill tube and let the bed drain out the overflow tube. I generally let the hose run for about 15 minutes then let the bed drain for a few hours. When I fill the reservoir again with fresh water, I feel confident the plants are getting the best water I have to give them.
Water can only wick up about 11.5 inches, so I would not make the reservoir any deeper than that. In my beds, I used 2 X 12’s for constructing them and my reservoir is about 10 inches deep.
I hope this answers your question sufficiently. If I can be of any further assistance, please let me know.
In the part 3 of wicking bed info you mention you went back to using 1/4″ river rock that was in version 1… but in part 1 you said you used 3/4″ river rock? Which is the right one to use if building the 3.0 version?
Thank you for pointing out the incongruity in the rock size. My implication was that I went back to rock not so much the size of the rock. I gave the size of the rock a lot of consideration before my friend and I picked it up. My thought is that the smaller the rock, the better the wicking potential.
I’m a first timer when it comes to raised wicking beds, but have been Vegetable gardening for 35 years. My bed utilizes 4” perforated drain pipe and 1” crushed stone. I placed landscaping cloth between that and my compost / peat moss / top soil mix. My drain is slightly above the stone layer, approximately 6” from the bottom of my bed.
My question is…
1. Do you recommend allowing the water level in the reservoir to drop periodically to allow air into that space? Hopefully to reduce odor.
Jim Gerry
I defer to Colin Austin, the inventor of the modern wicking bed, who does recommend letting the water level reduce to a level you are comfortable with and then fill the reservoir. The level to which you let the water reduce would depend on where you are located. Since I am in Phoenix, I fill my 4 X 8 bed about once a week during the summer and every three to four weeks during the winter, depending on what is growing.
Has anybody done this in ground? Lowered beds? I am on a hilltop that was leveled so basically solid clay. I was planning on digging my beds down cause the clay becomes like a container then. But we have severe drought so thought about doing wicking beds and maybe tie into rain water? It brings up a bunch of questions. Can you flush when below ground. I could go out to hillside. Can you use a tiller sagely? Do you want different depths for things like berries or tomatoes or salad greens. Can you automate filling the reservoir with something like a rachio which o have on my drip irrigation?
Safely not sagely. Also if you want to do double dig tilling for you run risk of hitting the equipment? And they recommend 2 feet deep tilling but I would imagine for salad greens you can’t have the wicking bed that deep?
Hi Erik,
Thank you for reading my article. I am not sure where you live or the size garden bed you are planning to construct, so it is difficult to answer your questions definitively.
There have been wicking beds made in-ground. Generally, they are in areas where the beds can be terraced on a hillside, where one bed’s overflow is directed into the next lower bed and so on. If you are considering digging down into level ground, you may be faced with challenges not normally encountered with traditional wicking beds.
Clay, even though difficult to dig in does have porosity and your reservoir water will seep into the surrounding material over time. Lining of the bed is still recommended for that reason. Here in the Phoenix area, our water is high in salts and minerals so we drain our wicking beds twice a year to avoid a build-up of those salts in our reservoir. Even in an in-ground bed, I would highly recommend some kind of system to work as an overflow/drain so your bed does not flood in the event of a heavy rain.
If you are using rain water as your primary source of water for your bed, draining twice a year is not such an issue. If you are considering automating the water level within your wicking bed, I would not recommend a timed controller. As the seasons change or the bio-load changes within your bed, the water demands change. These changes are difficult to predict. Instead, consider a float to control the water level.
Water can only wick up about 11 ½ inches so making the planting medium deeper than that depth will not be efficient. Using native soil heavy in clay particles is not a good idea because clay retains moisture for a considerable amount of time. Your plants need a good draining medium so they get enough air to the roots. That being said, a rototiller may not be the best tool to use in a wicking bed and native soil not the best planting medium. When I prep the medium to fill the bed for the first time, I mix potting mix, compost, AZOMITE, worm casting and mycorrhiza. When revitalizing my beds between seasons, I use everything but the potting mix. The depth of my reservoir is roughly 10 inches, as is the depth of my planting medium, for a total of 20 inches for both.
I mentioned in the article that the root ball for most plants will be about six inches in diameter, that is because water is always available at the root level and therefore, the root does not need to grow any larger than that. The 10 inches of planting medium is adequate for anything you would like to grow in the bed. The only suggestion I might make is that if you are planting tomatoes from starts, get the “leggy” ones and lay them on their side with only the first two to three sets of leaves above the soil level. That way they will have a longer root system than if you planted them vertically.
I hope I have addressed your question adequately. If you have more questions or would like clarification on answers I have given, please let me know.
Try hot tub water ports… they have about a 2 in thread… its theraded al the way thru the inside as well.. either 1 or 1 1/2in i cant remember… put it as low as possible put a 90 up and pipe to the water level you want