How to Start a Straw Bale Garden
By James White
Straw bale gardening is a natural and organic method that’s been around for some time now. It’s a great option for gardeners suffering from soil problems or who can’t work the land as hard anymore and need a raised bed. A straw bale garden requires a little more work than just plant and grow. Here’s how to make a successful bale garden from start to finish.

Why You Should Choose Bale Gardening
Straw bale gardening is extremely versatile and usually cheaper than a bag of potting soil. You can set your garden up pretty much wherever you want, as long as you have enough space. The straw bale will become compost to use for your garden (1) next year. Bales of straw can be found in gardening stores, feed stores or home improvement stores, so finding some to create a garden shouldn’t be a problem at all. Straw bale gardening is also perfect for gardeners who have poor soil that would take too much work to correct.
As a bonus, straw bale gardens work as raised garden beds for gardeners who don’t have the time or ability to work the earth. Gardeners with arthritis will especially appreciate the lack of digging and tilling involved. This method makes gardening more accessible for many people.
Getting Your Straw Bales
You want to be absolutely sure you’re getting straw instead of hay. While people sometimes think of them interchangeably, hay often contains seeds which can sprout once you begin the conditioning process (2). Straw is weed free, so there’s no chance of anything except your plants sprouting from inside the bale.
Buy organic straw if possible, and if you’re buying from a big chain store, be sure your straw hasn’t been sprayed with pesticides.
Choosing Your Location
Your straw bales are going to get really heavy once you begin the conditioning process to get them ready for planting, so you’ll want to find the perfect location before you get started. Like with any garden, you’ll need a spot that gets plenty of sun for your plants. If you pick an area that has grass, you’ll want to put down layers of cardboard or another material to prevent weeds from growing up into your bale.
Position your bale so the side with cut straw ends are facing up, not with the side that has folded straw. The folded straw is more difficult to work your way into and can be harder for plants to emerge through.
Start Conditioning Your Bale
Once moisture hits your bale it will begin to decompose, which means the inside of the bale will begin to heat up – definitely not something your new plants want. To get your bale ready for plants, you’ll have to let it cook for a little while first. Conditioning a bale takes anywhere from 10 days to two weeks, so monitoring its progress is the only real way to know when it’s ready.
Water your straw bales thoroughly for the first three days, making sure they stay damp at all times. After that you can begin adding nitrogen to assist in decomposition if you’d like, but it’s not necessary. If you do add nitrogen, simply add a small amount when you water for six days. After 10 days, stop adding nitrogen and go back to simply watering the bales. Insert a meat or compost thermometer into the bales to monitor the heat inside. Once the heat begins to drop and reflect the temperatures outside, your bale is ready for planting.
Choosing Your Plants
While straw bale gardens are really versatile, there’s still a few things that won’t grow well in them. Tall, indeterminate plants, such as corn and tomatoes, quickly grow too heavy to be supported by the bale (3), so you should skip planting these. Likewise, runner plants such as sweet potatoes are also harder to grow in bales.
Those living in warm and moist conditions may find their bale decomposing faster than straw bale gardens in other conditions, so your best bet may be to choose plants with a shorter growing time such as herbs or flowers.
Planting Your Bales
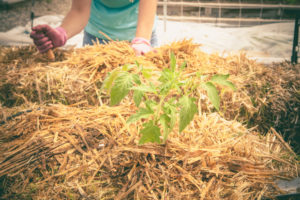
Now that your bale is ready to plant and you’ve chosen what you’re going to grow, it’s time to begin planting. Start by removing enough straw to make a hole deep enough to fit the root ball of your plant, or deeper if you’re planting determinate tomatoes. Place your plant into the hole, adding a bit of potting soil to support and feed your plant, then fill the remaining space with the straw you removed.
Straw bales offer less nutrition than a soil garden would, so keeping your garden watered and fertilized is necessary for the health of your plants. Fertilize your garden once a week (4) or every two weeks to feed the straw bale and keep your plants growing.
With a little time and effort, you can have the garden of your dreams without breaking your back. While it may not be the most traditional method, straw bale gardens have merits all their own. Your straw bale garden will repay your patience and effort with an abundance of life. Once this garden has run its course, it’ll become food for another garden – what’s better than that?
Sources
- http://homeguides.sfgate.com/straw-composting-24809.html
- http://www.rodalesorganiclife.com/garden/7-solutions-common-compost-problems
- https://bonnieplants.com/library/how-to-support-tomatoes/
- http://www.saferbrand.com/blog/beginners-guide-to-straw-bale-gardening/
James is a kombucha tea-sipping blogger who focuses on green building and sustainable living via his family blog Homey Improvements. He also enjoys sharing his recent discoveries with DIY projects, home tips and organic gardening. Connect with him on Twitter at @DIYfolks.
*Disclosure:
Some of the links in our podcast show notes and blog posts are affiliate links and if you go through them to make a purchase, we will earn a nominal commission at no cost to you. We offer links to items recommended by our podcast guests and guest writers as a service to our audience and these items are not selected because of the commission we receive from your purchases. We know the decision is yours, and whether you decide to buy something is completely up to you.


Thank you for sharing this wonderful avenue with others.
I garden in Straw bales and love it. Last year I had 15 bales and this year I have 31 bales growing about 40 different vegetables, along with using last years bales in boxes growing potatoes and strawberries at this moment.
I have now become a Straw Bales Garden Instruction through Joel Karsten, the breakthrough vegetable gardening method. I saw Joel during the Summit a year ago.
I wish I could put photos here, you would be amazed at the growth that can come from a straw bale. I had 9 feet purple okra that were great.
Greg, also, I would like to say thank you for being one of the speaker at the Summit the last March. Where Joel was the one that interested me last year, you caught my interest this year. You have inspired me to look at our property as an urban farm. I had already been doing worms, worms casting. We have a ditch running thru our acre lot and large amount of bamboo growing in one corner of the property.
I went to a Master Garden Expo last month and meet a MG who will be coming out to look at our property, letting us know what we need to do to convert to an urban farm.
Thank you
Robbie