Grow Buckets
A mini wicking bed container for water conserving gardens
by Raymond Jess
Find his podcast HERE
 Several years ago, I started my adventure with wicking garden beds. I found the concept powerful and wondered, how can I use this concept in a different way? I consulted the internet and found a few good ideas, but not quite what I wanted. I needed something I thought might stand up to the unrelenting summer heat of Phoenix, Arizona and produce a nice vegetable harvest. I came up with this design of a grow bucket.
Materials required:
-
- two 5-gallon buckets from my local hardware store
- one bucket lid (optional)
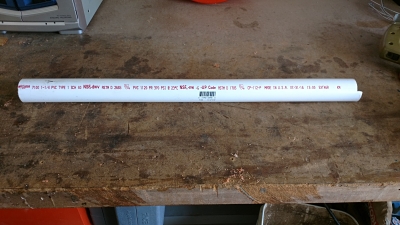
- a 2-foot section of 1¼-inch PVC pipe
- a 3-inch net pot I picked up from Amazon.com
Note – if using other buckets, this size may need to be adjustedThe net pot I used is a 3 ¼-inch by 3-inch basket used to hold the wicking material. I ordered the net-pots from Amazon (General Hydroponics 3” net-cup).
The 3-inch is the depth of the basket and not the hole size needed to fit it flush with the bottom of the inner bucket. That requires the 3 ¼-inch hole saw.
A few additional tools are required:
-
- a drill with 3 ¼ and
- 1 ¼-inch hole saw,
- ¼ -inch drill bit,
- hacksaw,
- ruler,
- and a pencil.
Planting materials:
-
- Approx 3/4 cu ft potting mix
- Soil amendments (mycorrhizae, worm castings, etc.)
- 2 ft x 2 inch strip of cotton towel (optional)
This size is approximate, and old cotton is best - Tomato cage (optional)
- 1 starter plant – i.e. a tomato or herb
Assembling the buckets
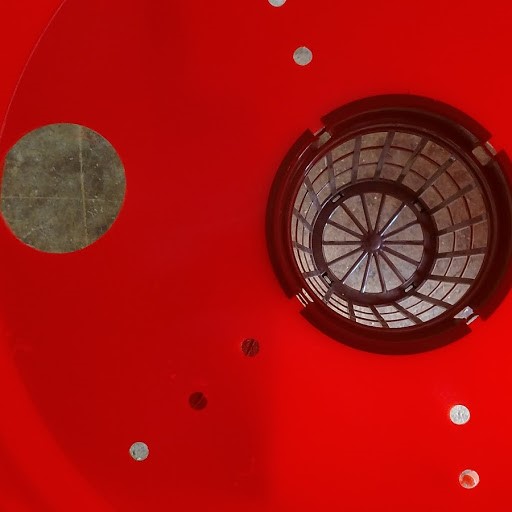
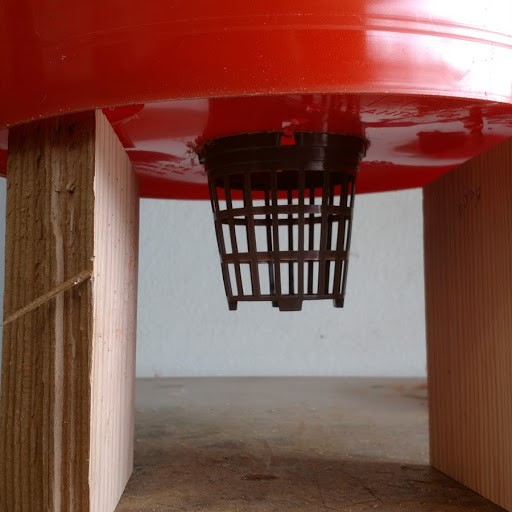
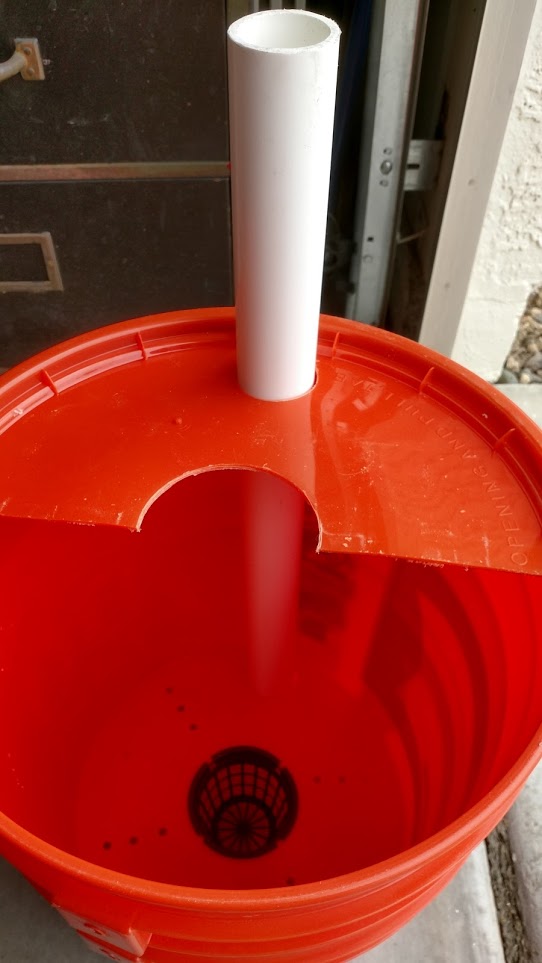
In the bottom-center of the inner (top) bucket I drilled the 3 ¼-inch hole for the net-pot. On the bottom near the side of the same bucket, I drilled a 1 ¼-inch hole to accommodate the fill tube and drilled a few 1/4-inch holes for drainage in case it rained and soaked the planting medium. Then I installed the net-pot, which simply sits in the hole I drilled in the bucket. This will be the planting bucket.
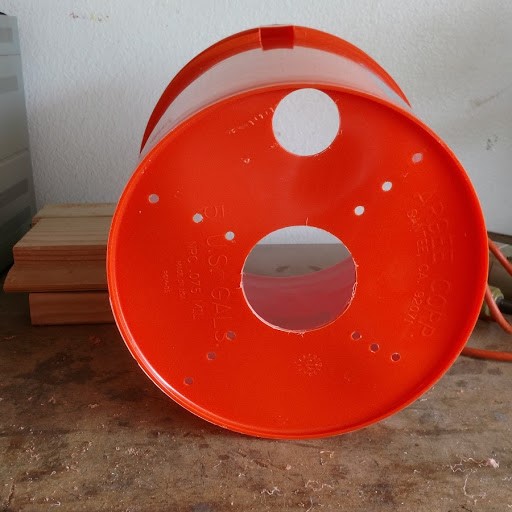
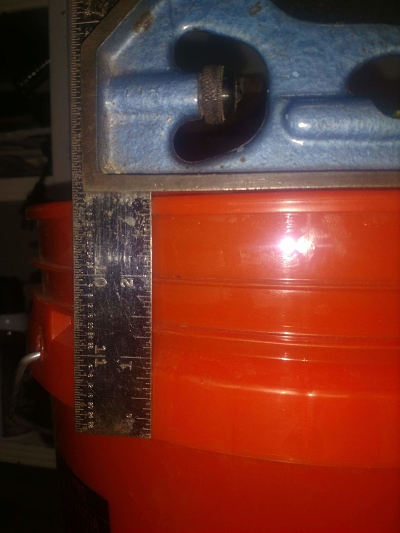
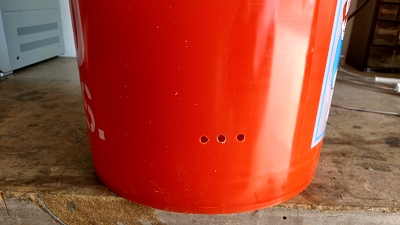
The outer bucket needed to have some drain holes installed to prevent the planting medium from getting or remaining too wet. To determine the height of the drain holes, I measured from the top of the bucket to the bottom of the protruding lip (where the inner bucket will set on top of the outer bucket), in this case the measurement is 3-inches, and made a mark. I drilled two or three ¼-inch holes, just below the line to facilitate water overflow and air intake. These holes can be next to each other or spread around the bottom bucket just below the 3-inch mark. This is now the reservoir bucket.
Now that the bucket portion of the project is complete, I began construction of the fill pipe. I used a 1 1/4-inch PVC pipe because it is easy to fill with a hose. I used a hacksaw to cut a notch into the bottom of the pipe to allow water to freely enter the reservoir bucket.
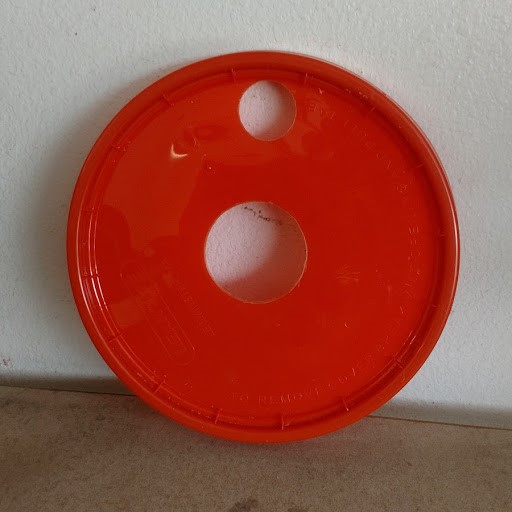
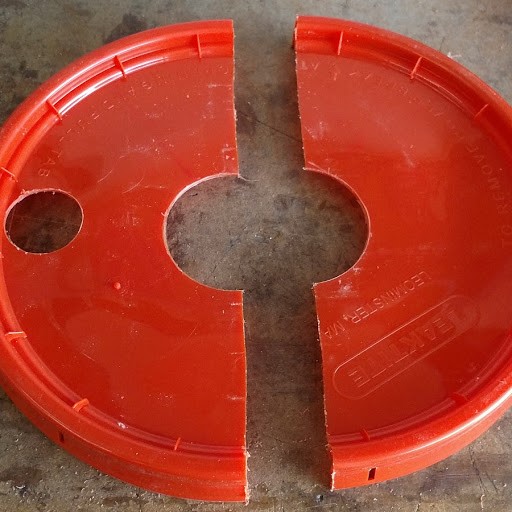
The lid is the next portion of the project. I cut holes like I did for the bottom of the inner bucket—one large hole in the center of the lid and one 1 ¼-inch hole on the side of the lid near the edge. Then I cut the lid in half. The lid is not necessary to make the grow bucket function. However, it does hold the fill tube securely, prevents weed seeds from getting into the growing medium, and helps reduce moisture loss from evaporation.
Producer’s note: Before moving to the next stage, this is the time to paint or decorate the bucket and fill tube. Lighter colors will be best to reduce heat absorption. Wrapping the bucket in shade cloth or burlap is also optional, and can protect the plastic from the sun, but be sure to keep the venting/drain holes clear.
Getting ready for planting
Now that the grow bucket is complete, I prepared the wick portion of the bucket. There are two types of wicks commonly used. The first is a soil wick where the planting medium is compacted tightly into the net-pot and into the lower one-half of the bucket. The second method is to use a cotton wick. I have tried both methods. The soil wick will last as long as your bucket and does a good job. The cotton wick will move water more efficiently than the soil wick but will generally last one or two growing seasons before it needs to be replaced. I used an old cotton towel cut into strips across the width of the towel, wadded up a portion then stuffed it into the net-pot.

Planting vs Potting mix
Now I fill the grow bucket with planting medium. Do not use soil (dirt) because it is too heavy and holds onto moisture which will rot the roots of your plant. And, I do not recommend a “planting mix” or moisture retaining mix for the same reason. The grow bucket is, after all, a self-watering pot and therefore needs a good quality “potting mix”.
Whatever potting mix you choose must be moistened to the consistency of a damp sponge before you add it to the grow bucket. This aids in the wicking of water from the reservoir bucket. When adding potting mix to the inner bucket, pack the mix tightly into the net-pot and about half-way up the inner bucket, this will help with the wicking of water from the reservoir—bottom bucket. If using a cotton wick, hold the wick end up as you pack potting mix around it and firmly pack the mix.
The upper half of the bucket can be packed more loosely and watered in to moisten the medium before you put the plant in. I add worm castings (slow release fertilizer type amendment), AZOMITE (trace elements) and mycorrhizae (beneficial fungus for root growth) to the top half of the planting medium. These amendments help the plant become established quickly and give the nutrients necessary for strong growth.
Watering your plant
When finished planting your new plant into the bucket, I recommend lightly watering from the top once or twice to get the roots moving into the new medium. Once the plant is established (one to two weeks), let the wicking action from the reservoir do the watering for you.
Observations
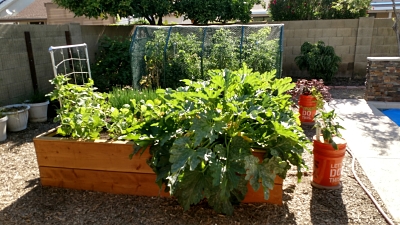
Through my experience, grow buckets works best with transplants and not direct seed sewing as there is very little moisture at the surface of the planting medium. Sadly, grow buckets did not do well in the direct sunlight and heat of our summer sun. These buckets do not have the mass necessary to withstand direct summer sun and, therefore, work best for fall, winter and spring crops.
There are pros and cons to gardening with grow buckets.
Pros:
-
- 40-50% water saving over conventional top watering
- Use less fertilizer
- Nutrients remain where they are put and not washed away by top watering
- Water is at the root level
- The overflow holes prevent over-watering
- The pot is drier at the top, therefore reducing the number of weeds
- Salt and minerals are not added to the planting medium from top watering
- Ideal growing planter for small areas
Cons:
-
- Due to the small mass of the planting medium, it will not withstand the direct sun and summer heat. During hot weather, I recommend morning sun, afternoon shade.
- Best for annual plants
- Planting medium needs to be revitalized with fresh nutrients before each seasonal planting
Local alternatives for Phoenix Area
Would you like to participate in a local hands-on workshop to make one of these buckets with Raymond? Click HERE to indicate your interest and we will plan another event.
Would you prefer to buy a pre-made bucket and pick it up at one of local events? Click HERE to buy online.
UrbanFarm.org/growbuckets
About this author:
 After retiring from two careers, the Air Force and teaching, Ray pursued his love of food by graduating from the Phoenix Art Institute with a certificate in Culinary Arts. The highlight of his culinary experience was working as a chef for the 2007 Super Bowl at the University of Phoenix Stadium. Natural extensions for this self-proclaimed foodie were the completion of his Master Gardener training and his Certificate in Permaculture Design.
A love of fresh foods and herbs kept him gardening for the last two decades. During a volunteer component of his Master Gardener training, Ray discovered wicking garden beds. A man of curiosity and a seeker of ways to do things more efficiently, he embarked on a research project leading him to the Father of Wicking Beds, Collin Austin. As a result of Ray’s research, his backyard garden has evolved from rows of crops in a plot of ground, to raised beds, to grow-buckets and wicking beds. He is currently keeping his eyes open for the next great idea to perfect his garden, so he can keep giving his family, friends, and neighbors fresh produce.
How to reach Ray
Link to Ray’s article on Building My Wicking Bed
Link to Ray’s Featured Farmer Interview
You can send an email to Ray at podcast@urbanfarm.org and it will be forwarded to him
I did grow buckets for tomatoes 7 years ago. They worked great, except the tomato plants became root-bound and then died before most of my tomatoes could ripen. I read later that tomato plants (or seeds) be suitable for container gardening, or else larger “buckets” created from storage bins should be used. Is there anything else that would cause the root-bound problem?